

In Progress: Recycled Frame Fragments
 One of our local frame shop owners is retiring this year after 30 years in business. She called me to see if I wanted the frame samples to "Create Recklessly" with. I was thrilled and immediately went down and filled three bins with beautiful textured and colored frames. I am swamped with deadlines right now, but the frames kept staring at me so I "budgeted" myself one hour to play with them. As a result, this blog project is not as refined as I'd like, but I'd thought it would be fun to share an "in progress" piece as I explore a new material.
Prep the Frames
I prepared the frames in two ways. First, if the frame was especially thick or angled, I cut it thinner using my band saw. Safety is of utmost importance when using this tool. The leg of the frame allowed me to safely push the frame part of the way through without my fingers coming anywhere near the blade. Second, I placed painters tape over the decorative surface to help preserve it.


Create the Bezels
I used Judy Freyer Thompson's bezel technique as previously shared in her guest blog. Instead of buying copper pipes, I used copper coupling so that I could have a little bit of a lot of sizes. I used a chop saw to cut off a slice of each pipe and then sanded and soldered them together. A decorative edge was applied using the edge of a riveting hammer.

Drill the Frames
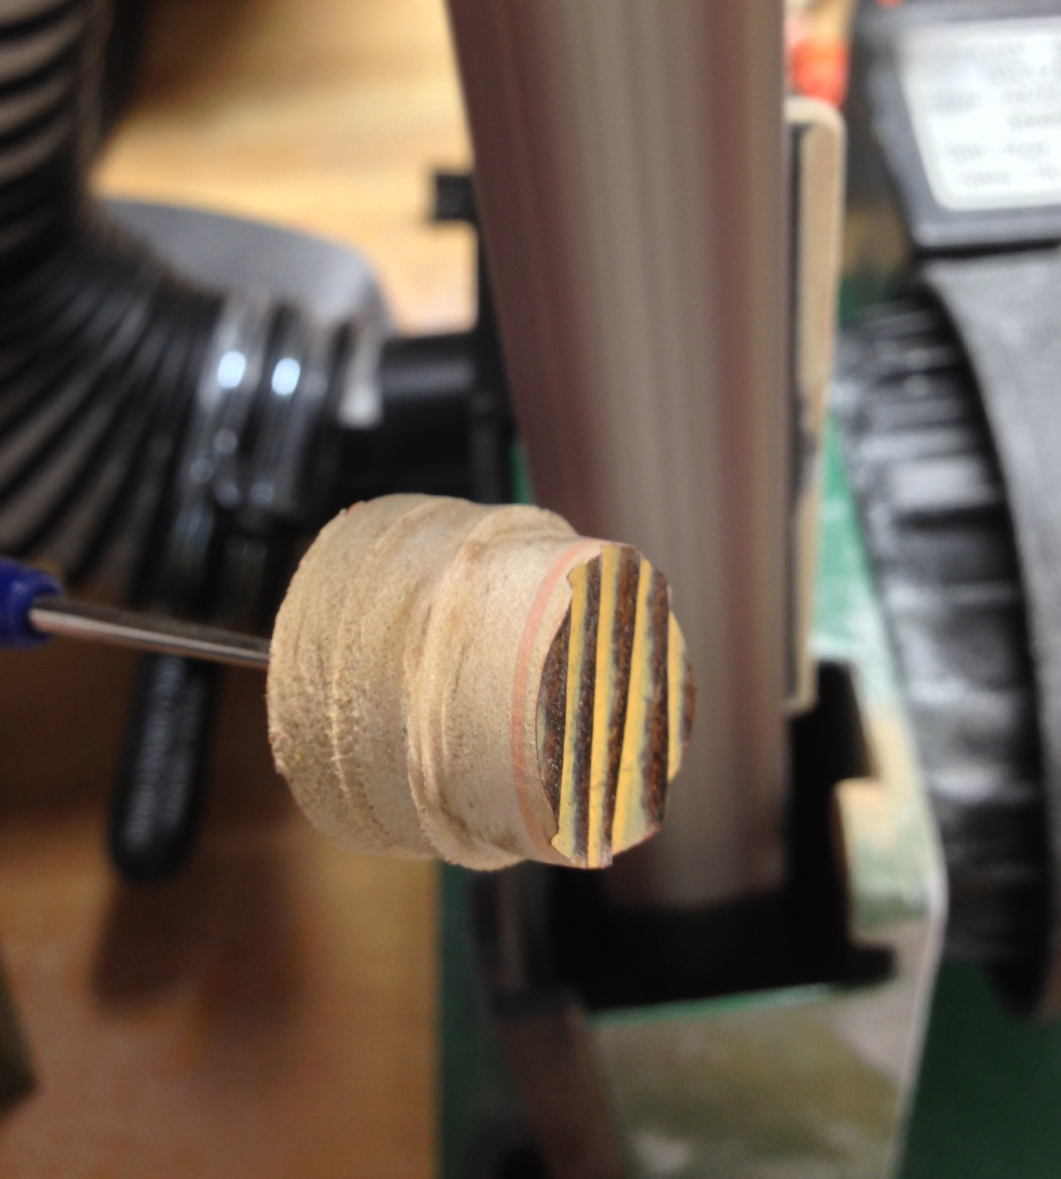
I used a hole saw bit in my drill press to cut the frame into circles that were one size larger than the bezel sizes. It is important that you secure your stock when using this equipment as it can easily catch on the saw bit and spin at high rates or fling across your room.

Sand the Frames
I hammered an awl into the back of the frame stock and sanded it on a belt sander until it fit the bezel snugly. You have to be careful to not oversand (you can see that the wood is actually a bit too small on the smallest bezel).

Assemble the Piece
I placed the wood pieces into the bezels, occasionally having to hammer the wood in if it was a tight fit. I then used a small hacksaw to cut the excess wood off of the back and used the belt sander to sand the back flush with the bezels.
I stopped here, but my intention is to tap some wire into screws and insert these screws through holes drilled into the sides of the bezels, this will secure the wood rounds. I would then stain the back of the wood in different shades, making the pendant reversible.
On a final note, I asked the frame shop owner what would happen to the remaining samples. I took less than 1%. Once I heard that they were destined for the trash bin, I knew what I had to do. I spent two days packing up the store. Half of the store I donated to Tinkertopia and the other half I hand selected for my friend Linda Larsen's website Objects and Elements. Linda and I will go though the stock and package it up and will offer it on her site by mid-April. I hope you'll be inspired as much as I am by these beautiful wood pieces and rejoice in the fact that we saved them from the landfill. More projects to come!
Create (and recycle) recklessly,
Melissa

Wow I can't believe you already made something and I am so jmpresssed by all your "reckless" tool use! I love that piece and love that you didn't let them go in a landfill!
ReplyDeleteMelissa, you are simply amazing! I wish I still lived nearby so I could see you and your work more often. But I feel like I can still connect this way. Thanks!
ReplyDeleteHi Mary!! Hope you are doing well. We miss you out here! : )
Delete