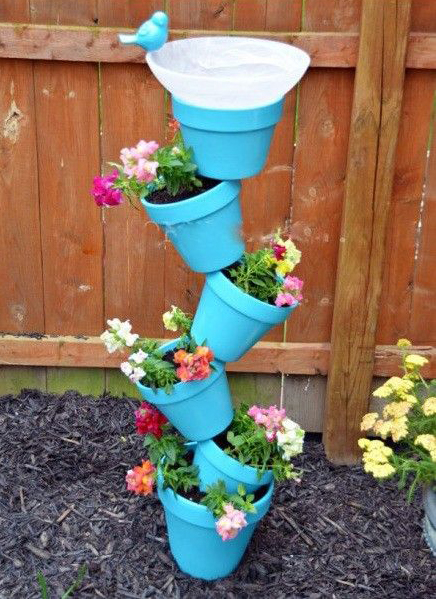
This month's topic: Pinterest Inspirations
Melissa Cable (Copper, C-Koop enameled headpins, air plants)
This month we were tasked with creating something inspired by a Pinterest pin. I had seen this planter last year and pinned it so that we could make it for my mother-in-law for Mother's Day. It was the perfect inspiration for my kitschy pendant.
This pendant really stretched my soldering skills! Believe it or not, the plants are real. They are "air" plants and just require a light misting now and again. I'll be interested to see how this affects the patina of the copper over time.
Want to give it a try? Step-by-step instructions are below...sorry there are not more photos...I got so excited while making this that I forgot to stop and shoot pictures!
1. Start with a trip to the hardware store (yay!) to buy 1", 0.75" and 0.5" copper couplings and some 3/32" copper tubing. I suppose you could buy slip caps and have less soldering.
2. Apply a pattern on your couplings by inking a stamp with Stayz On ink and rolling the coupling across the pattern. Heat set the ink with a heat gun.
3. Etch the copper. See the recent issue of Art Jewelry for an article I wrote on vertical etching and the Edinburgh Etch. I create a hook using a 3mm Faux Bone strip so that I could hang my couplings into the solution.
4. After the copper is etched and cleaned, use a jewelers saw and cut a 1" piece from each coupling. Lay the edges flat on 320 grit sandpaper and sand flat, follow up with 400 grit sandpaper.
5. Solder each coupling piece to a piece of 22g copper sheet to create a bottom for each pot. The 1" coupling is thick and requires quite a bit of heat, but I was still able to accomplish the soldering using a butane torch and medium solder.
6. Use a jewelers saw to cut off the excess copper sheet.
7. Use dapping punches to flare the top of each pot. Turn the pot over and hammer down flat on the bottom to get the edge of the pot to flare evenly and flatten some.
8. File the bottom edge and the rim edge. I used a sandpaper disk on my flexshaft.
9. Drill a 3/32" hole in the center bottom of the medium and small pots.
10. Pickle if needed and then solder a 2.75" piece of 3/32" tubing to the inside center bottom of the large pot (I used easy solder). I flared the bottom of the tube to give it more stability while I soldered.
11. Solder 1-2 headpins inside each pot so that you can use them to secure the plant. I used enameled headpins by C-Koop with soft solder to add a pop of color. This can be tricky as the pins easily melt if they get too hot.
12. Feed the medium pot onto the tubing and position it as desired on top of the large pot. Locate a solder point and solder the medium pot in place (I used easy). I soldered the inside rim of the pot to the tubing. Repeat with the small pot. I soldered the bottom of the small pot to the rim of the medium pot.
13. Solder a ring to the top of the tubing (I used easy), making sure to place your chain in the ring before soldering. I had also soldered a small brass ball bearing on the top of the tubing to give it a finished look, but it fell off and my 4 hour time limit was running out!
14. Pickle, patina and polish. Insert the plants and wrap the headpin(s) around them to keep them in place.
Have fun with it and create recklessly!
Melissa
Be sure to check out the other great Pinterest inspirations by my fellow Synchrobloggers...what an awesome group!!


This came out wonderfully!!! I think next Pinterest Project I will have to make jewelry!
ReplyDeleteThanks Janice! I'm looking forward to looking at everyone's projects tonight!!
DeleteFabulous! you are always such an inspiration with your unique way of looking at things. I really appreciate you sharing with us, it makes me look at things differently!
ReplyDeleteThanks Linda! xoxo It's fun to have creative people to share it with!
DeleteWow - I absolutely adore this! What a creative, fun idea. (And I think I need some of those "air" plants...maybe I won't kill them??)
ReplyDeleteHa ha...Trust me, I was thinking the same thing as I sit here looking at my dead window herb garden. The happiest those plants were was when my neighbor watched them while I was on vacation!!
DeleteHi Melissa,
ReplyDeleteI took a couple of your classes at the Bead & Button show and loved them both. I'm looking forward to following and reading your blog as well.
Funny thing, I have the same garden idea pinned on my Pinterest page, but never thought of transferring that idea to jewelry. Genius indeed!
Thanks for sharing,
Margaret W