Monday, August 26, 2013

Chang "My" Noodles

It's been a while since I've posted a recipe. After a week of belated Spring cleaning (meaning a week of eating take out while my house is in a state of disaster) I am sitting down and planning meals for the next few weeks. In the process, I came across one of my favorite recipes. Although not reckless in itself, how I fell in love with this noodle dish was unintentionally, unconsciously and uncontrollably reckless.

Have a great week!

Melissa

Chang "My" Noodles


While pregnant with my oldest daughter, I craved this soup constantly. When my local Thai food restaurant, Typhoon, took it off the menu, I had a pregnancy-hormone induced breakdown in their lobby. There were tears. And sobbing. I'll leave it at that. As a compromise (mostly, I believe to get me out of their lobby), the chef agreed to make it for me every Monday, on which my husband picked it up weekly on his way home from work. 

The restaurant closed last year, but luckily, without pregnancy hormones I could be creative enough to learn how to make it myself rather than throw a tantrum (although I think there may have still been some tears). After some research, I was able to adapt a Seafood Hot Pot recipe by Sam Hazen from Self Magazine (November 2006) to reflect the flavors of this traditional soup from the Chang Mai region of Thailand (an area known for its beautiful silver). This soup is also good with shrimp in place of the chicken.


1 Tbsp of olive oil
1 small diced onion
2 thinly sliced shallots
1 minced clove of garlic
1 large thinly sliced raw chicken breast
1 cup of sliced mushrooms
3 cups of chicken stock
1 can of coconut milk
2 Tbsp fish sauce
3 Tbsp of rice vinegar
1 tsp curry powder
1 Tbsp soy sauce 
1 Tbsp sugar
4 ounces of rice noodles
1 lime, juiced
2 cups of baby spinach
6 sprigs of cilantro, plus some chopped for garnish
1 cup of bean sprouts


1. In the olive oil, sauté the shallots, garlic and onion until soft, about 3-5 minutes.

2. Add the chicken breast to the onion mixture and cook for 1-2 minutes. Add 1 cup of mushrooms and cook for an additional 1-2 minutes.

3. Add chicken stock, coconut milk, rice vinegar, fish sauce, Thai chili paste, curry powder, soy sauce and sugar. Bring to boil over medium high heat.

4. Add cilantro and simmer for 10 more minutes.

5. While simmering, bring a medium saucepan of water to boil. Stir in rice noodles and remove from heat. Let stand 7-10 minutes until soft. Drain.

6. Remove cilantro. Season soup as desired with the juice from one lime.

7. Add baby spinach and allow to wilt.

7. Divide noodles between 4 bowls and top with soup. Garnish with bean sprouts and chopped cilantro.

PS - If you are in the Los Angeles area, be sure to try out AmazonFresh grocery delivery services, now available in your area. We've been using it here in Seattle for years and its great!

Sunday, August 18, 2013

Warm Connections


Hilary's Garden: Brass, Sterling silver and spinel by Melissa Cable


Warm Connections

Anytime I learn something new, I find myself in a phase that I call the "why phase." This is a period of time in which I question whether I am doing a particular technique out of habit, because it is new and I am excited to apply it, or because, simply, it is the right thing to do in that particular circumstance.

Case in point, now that my soldering has improved, I want to solder everything! However, my most recent creation really pushed me to stop and consider when to combine cold connections with soldering...what I am going to call "warm connections" for the sake of this discussion.

Hilary's Garden was commissioned by Hilary Halstead Scott from Halstead Beads for their 2014 catalog (available in January). I've had Hilary as student and know she has the mad skills to create some killer flowers herself, so I was especially honored and excited that she would ask. Even more inspiring was that there were no parameters...no request to use certain items, no specific jewelry type, size, or color...I had a blank canvas to work from.

I happened to have some Sterling silver branch pieces that they had in their catalog and they became my source of inspiration. They had three loops - one on each end and one in the middle. Rather than give you a step-by-step on how to make this, I believe there is more learning in the thought process. I first considered:

1) Connecting the branches together with jump rings and riveting the flowers to the center loop. (Problem: The flowers covered most of the branches.)

2) Soldering the flowers together and between two branches. (Problem: The branches became solid, meaning the necklace would not have any flexibility.)

So I finally decided on a hybrid. I soldered the flowers together and then soldered them to a tube rivet. I then use the tube rivet to connect the branches together, which allowed them to still pivot freely. Surprisingly, it took me a long time to get to that solution...I had a mental block with soldering something that would eventually be riveted anyways! But when I finally stopped and realized that this "warm connection" had purpose, it was the right thing to do, the choice became clear.

It is also of interest to note that once I was all done with the necklace, I didn't like the look of the empty center rings on each branch and I was frustrated with myself that I hadn't soldered on some brass ball bearings from the start. At this point, everything was polished and ready to go.

Warm connection to the rescue! I soldered the ball bearings to a tube rivet and riveted them on. Now, if I were to remake this necklace, I would solder them in from the start, but finally becoming comfortable with using "warm connections" allowed me to make, what I feel, a much stronger piece with the addition of the brass accents.

To sum up the lesson learned: You never graduate from one technique to another, you simply add a new technique to your toolbox.

Thanks for stopping by, and create recklessly this week!

Melissa

PS - Congratulations to Rebecca Rose of Sculpturings, this year’s winner of the Halstead Grant for design excellence and business strategy acumen in the silver jewelry market! Be sure to check out her work...its gorgeous!


Wednesday, August 14, 2013

Pinterest Inspired

The Artists Synchroblog is a group of bloggers who post every other month on the same topic, sharing our experience or perspective. On alternate months we undertake a Pinterest Project where we each take inspiration from a pinterest picture, create something (art, a meal, a DIY project, etc) and then post about it.


This month's topic: Pinterest Inspirations


Melissa Cable (Copper, C-Koop enameled headpins, air plants)

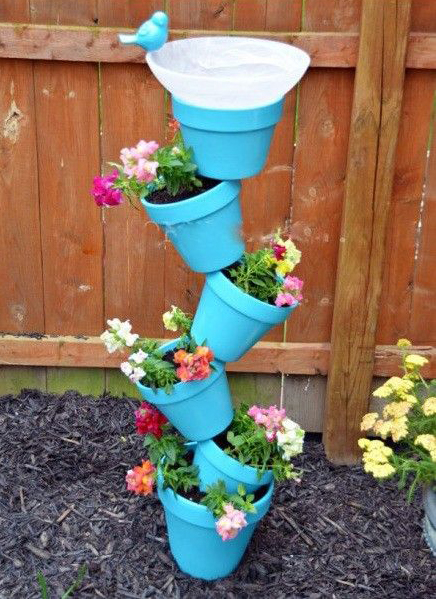
This month we were tasked with creating something inspired by a Pinterest pin. I had seen this planter last year and pinned it so that we could make it for my mother-in-law for Mother's Day. It was the perfect inspiration for my kitschy pendant.


This pendant really stretched my soldering skills! Believe it or not, the plants are real. They are "air" plants and just require a light misting now and again. I'll be interested to see how this affects the patina of the copper over time. 

Want to give it a try? Step-by-step instructions are below...sorry there are not more photos...I got so excited while making this that I forgot to stop and shoot pictures!

1. Start with a trip to the hardware store (yay!) to buy 1", 0.75" and 0.5" copper couplings and some 3/32" copper tubing. I suppose you could buy slip caps and have less soldering.


2. Apply a pattern on your couplings by inking a stamp with Stayz On ink and rolling the coupling across the pattern. Heat set the ink with a heat gun.

3. Etch the copper. See the recent issue of Art Jewelry for an article I wrote on vertical etching and the Edinburgh Etch. I create a hook using a 3mm Faux Bone strip so that I could hang my couplings into the solution.


4. After the copper is etched and cleaned, use a jewelers saw and cut a 1" piece from each coupling. Lay the edges flat on 320 grit sandpaper and sand flat, follow up with 400 grit sandpaper.

5. Solder each coupling piece to a piece of 22g copper sheet to create a bottom for each pot. The 1" coupling is thick and requires quite a bit of heat, but I was still able to accomplish the soldering using a butane torch and medium solder.

6. Use a jewelers saw to cut off the excess copper sheet.

7. Use dapping punches to flare the top of each pot. Turn the pot over and hammer down flat on the bottom to get the edge of the pot to flare evenly and flatten some.

8. File the bottom edge and the rim edge. I used a sandpaper disk on my flexshaft.

9. Drill a 3/32" hole in the center bottom of the medium and small pots.

10. Pickle if needed and then solder a 2.75" piece of 3/32" tubing to the inside center bottom of the large pot (I used easy solder). I flared the bottom of the tube to give it more stability while I soldered. 

11. Solder 1-2 headpins inside each pot so that you can use them to secure the plant. I used enameled headpins by C-Koop with soft solder to add a pop of color. This can be tricky as the pins easily melt if they get too hot.

12. Feed the medium pot onto the tubing and position it as desired on top of the large pot. Locate a solder point and solder the medium pot in place (I used easy). I soldered the inside rim of the pot to the tubing. Repeat with the small pot. I soldered the bottom of the small pot to the rim of the medium pot.

13. Solder a ring to the top of the tubing (I used easy), making sure to place your chain in the ring before soldering. I had also soldered a small brass ball bearing on the top of the tubing to give it a finished look, but it fell off and my 4 hour time limit was running out!

14. Pickle, patina and polish. Insert the plants and wrap the headpin(s) around them to keep them in place.

Have fun with it and create recklessly!

Melissa


Be sure to check out the other great Pinterest inspirations by my fellow Synchrobloggers...what an awesome group!!